Our Ultrasonic Testing (UT) Service
Ultrasonic Testing (UT) is a non-destructive test (NDT) used to detect flaws, take dimensional measurements, and do material characterization. UT is recognized for having the highest depth of penetration to detect subsurface flaws. Ultrasonic testing equipment is highly accurate in determining flaw position and estimating size and shape. In most cases, it is only necessary to have one-side access to evaluate with immediate results. The equipment is portable, and its operation is non-hazardous to work processes or personnel.
Ultrasonic testing can detect common and uncommon discontinuities caused by base material processes and fabrication as well as flaws in ingots, continuous castings, billets, plate and sheets, bar and rod, pipe and tubular products, forgings, castings, composites, and welds.
Common Flaws UT can find
- Shrinkage Cracks
- Stringers
- Laminations / Seams
- Hydrogen Flakes
- Burst, Porosity, and Gas Holes
- Incomplete Fusion/Penetration
- Welding Defects
Commonly Tested Materials
- Many types of Metals
- Nickel
- Aluminum
- Lead
- Many Ceramics
- Glass
Common Applications
- Structural Steel
- Pipeline Welds
- Weld Inspections
- Turbine Rotors
- Pipe Testing
- Butt Welds
- Nozzle Testing
- Landing Gear
- Composites
- Spindle / Shaft Testing
- Aircraft Components
- Wall thickness measurements
Contact G.Cotter for all your Ultrasonic Testing (UT), non-destructive testing (NDT) needs.
We are a full-service weld, machine, and inspection shop for the aerospace, military, nuclear, commercial, medical, and tool industries.
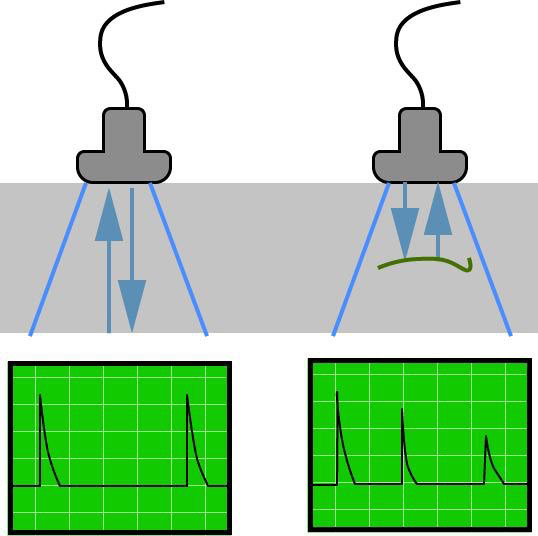
Principle of ultrasonic testing. A probe sends a sound wave into a test material. There are two indications, one from the initial pulse of the probe, and the second due to the back-wall echo.

A defect creates the third indication & simultaneously reduces the amplitude of the back-wall indication.
Ultrasonic testing uses high-frequency sound waves that travel through the test material - for instance, a piece of steel - until they encounter a boundary with another medium, like air. The boundary then reflects to the sound wave’s source. By analyzing these reflections, inspectors can measure the thickness of the test piece, or find evidence of cracks or other hidden internal flaws, which would be indicated by a different reflection than that produced by a solid material. Generally, an ultrasound transducer connected to a diagnostic machine is passed over the object being inspected. The transducer is typically separated from the test object by an ultrasonic medium (such as oil) or by water, as in immersion testing.
There are two methods of receiving the ultrasound waveform, reflection, and attenuation.
In reflection (or pulse-echo) mode, the transducer performs both the sending and the receiving of the pulsed waves as the "sound" is reflected back to the device. Reflected ultrasound comes from an interface, such as the back wall of the object or from a flaw within the object. The diagnostic machine displays these results in the form of a signal with an amplitude representing the intensity of the reflection and the distance, representing the arrival time of the reflection.
In attenuation (or through-transmission) mode, a transmitter sends ultrasound through one surface, and a separate receiver detects the amount that has reached it on another surface after traveling through the material. Imperfections or other conditions in the space between the transmitter and receiver reduce the amount of sound transmitted, thus revealing their presence. Using the ultrasonic couplant medium increases the efficiency of the process by reducing the losses in the ultrasonic wave energy due to separation between the surfaces.